September, 2016
In the last few years since our update of 2014, we have accomplished the following:
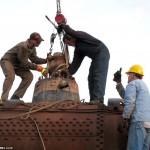
- Removed all the brake rigging (except for 1 of the 4 brake beams that is being really stubborn we should have it off this month).
- Removed all the springs and spring rigging.
- Erected a 50 ft long carport over the Coos. The shade it provides is a real life-saver during the summer.
- Cleaned both main frames and looked for welds and looked for cracks using dye penetrant. We found a total of 8 welds; two cracks in one very large weld and one crack in a smaller weld.
- Painted the cleaned areas of the frame with gloss black Hammerite® paint.
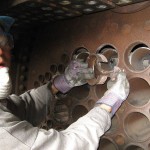
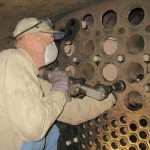
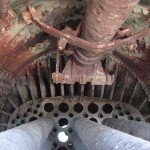
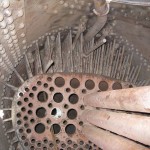
- Ground off the seal welds on many more tube stubs on the rear tube sheet. The tube stubs were then removed. The remaining tube stubs should be removed by October, 2016.
- We had previously noticed that the fuel tank was still about 40% full of fuel, of unknown composition and was at least 30 years old. Because of those factors, and the need to reduce the weight to jack up the rear end to remove the third set of springs, our waste oil hauler removed most of it in December, 2015. We were able to drain off the remainder in February, 2016, and transfer it to our waste oil tank.
- Since Jan. 1, 2006, our group has put in 5,197 hours working as a group, with 4,259 hours actually working on the Coos Bay. That works out to 650 8-hour days for the group total, and 532 days, or 82% of our total time working on the Coos. There are about 22 working days in a month so we have put in the equivalent of about one person working full time for only 24 months on the Coos Bay. So, for comparison, Union Pacific’s full time steam crew of about 6 (including our former volunteer, Jimmy Thompson) could have completed what we have done in four months. Maybe less, since they know what they are doing!
We are now at a point where we can get a testing company to come out and check the welds for quality via ultrasound or radiography. Our consultant, Stathi Pappas has suggested that some existing boiler patches and a couple of areas suspected of having “grooving” be radiographed. I’ll be working on getting those tests done in the next month or two. After that, we should have a very good handle on what will need to be done to return the Coos Bay to operation. Our concentration then will be to get some good estimates on what it will cost.
Some images to help tell the story:
September, 2014
In the last few years since our update of 2010, we have accomplished the following:
- All tube stubs have been removed from the front tube sheet. Except for a few nicks caused when removing the tubes, it is in good shape.
- A 1′ by 1′ grid has been drawn on the entire boiler
- Ultrasound thickness measurements were done by Dennis Daugherty at each point on the grid, completing the ultrasound examination of the boiler, dry pipe and front tube sheet. Earlier visual examinations indicated that with the exception of the lower one third of the firebox sheets, the boiler was in good shape. The ultrasound exam confirmed this. No significant thin spots were found.
- The welded tube ends had not been removed from the rear sheet, so a complete exam of the rear sheet still needs to be done. About half of the tube ends have been removed. The lower portion of that sheet, along with the lower portions of the side and door sheets show a lot of corrosion, so will need replacing. There appears to be a crack at the top along the knuckle.
- The front heads on both cylinders were removed, and the interiors inspected. No significant wear was observed; there was some light rusting. The diameters were checked with a micrometer, and found to be round within a few thousandths of an inch. The pistons can be moved freely back and forth.
- Lots of crud has been scraped off the frame and running gear, and the entire locomotive steam cleaned.
- The FRA requires that all the flexible staybolt caps be removed to help determine if the bolts are intact. Since it has probably been 40 or 50 years since this has been done, removal of each cap can be difficult. We remove the cap, clean out the crud that has built up, clean and grease the threads, and replace the caps. This will make it much easier to remove the caps when we actually test the staybolt integrity. There are literally hundreds of staybolt caps on the firebox. So far we have removed and cleaned just about all that are above the cab floor, but there are LOTS MORE below the floor.
- The firebox ends of the tubes are seal welded. While the tubes themselves have been cut out; short, welded-in stubs remain, and the welds must be ground off. There are about 160 two inch tubes and 26 five inch flues. So far, about half the welds have been ground off.
- The axle diameters have been measured, and it looks like they are all ok.
- We have started removing the “plumbing” that runs below the cab and running boards so that we can get at the lower staybolt caps.
- The Board approved our request to hire Mr. Efstathios “Stathi” Pappas as a consultant. Stathi was the chief mechanical officer of Mt. Rainier Scenic Railroad, and recently finished a complete overhaul of their Hammond Lumber Co. #17, a near twin to Coos Bay #11. His experience in working on #17, gives him a very good idea of what to look for on the Coos Bay. He came to Campo in mid-October to look at the Coos. (He is now the Curator of Collections at the Northwest Railway Museum, in Snoqualmie, WA)
- “Form 4″ calculations for the boiler are being done by Ron Amberger, a new volunteer in the last year. He is a Professional Engineer, and is qualified to do these calculations, and has previously done several Form 4 calculations for other locomotives. These calculations, using the ultrasound thickness measurements, size of various braces, etc. are used to calculate a theoretical “strength” for the boiler. These calculations need to show that the boiler can handle a pressure four times higher than the actual working pressure of the boiler.
- Stathi’s report has been received. The quick, short, summary is, “This locomotive will not be an easy restoration, but is quite achievable given institutional commitment to the project, and the realization that its return to steam will be a multi-year project requiring grant money and aid from other institutions with the more technically challenging aspects……… If this locomotive was part of this author’s fleet, the work could be completed in three years for approximately $200,000.”
- The biggest “surprise” from Stathi’s report is the following: “First, and perhaps most interesting is the fact that it appears all the frame connections leading to and from the cylinder saddle were broken and welded back together. It is possible that this occurred during one catastrophic event, or could have been the cumulative results of long term heavy service and/or abuse. The weld repairs appear to have been very competently carried out in terms of their outward appearance. However, it would be good insurance to radiograph some or all of these welds before investing a great deal of resources into the locomotive in order to prevent surprises later such as incomplete penetration, incomplete fusion, or extensive internal flaws. Regardless of the quality of welding, this condition is something that warrants careful observation if the engine is returned to service to ensure the welds do not begin to crack.”
- As a consequence of the above, we spent some time wire-brushing and scraping more crud off the frame so that the welds could be tested. Due to scheduling conflicts, both with the testing company and at the museum (crew shortages), we were not able to have the welds looked at until the end of May. Decisive Testing, Inc. did the job as a donation. THANK YOU! The technician was able to tell us that several of the welds were good, one had an obvious crack, and some others were located where he couldn’t get his testing instrument. His recommendation was that we try to remove everything that we can that is in the way, thoroughly clean the frame, and test it with dye penetrant.
THE NEXT STEPS
Outside, we steam cleaned the frame, but to start removing the things that obscure the frame, the brake and spring rigging, we will need to access the pit for a few days. This may happen in September.
Because of the delays in accessing the shop, I decided that we really need to have a more permanent place to work on the Coos Bay. Also, since the board recently met to come up for goals and plans for the future, I asked them to tell me where steam fell in their priorities, and if we could have a fixed location to do our work under some type of shelter. They approved us setting up a work shelter for the Coos at the west end of Track 11 (under the ATSF gantry crane). Depending on budgeting and space required, this space may be a tent-type fabric-covered one or a metal car port type.
Once we can access the pit, we need to remove the brake rigging, at least that part of it that is under the axles, so it will be easier to crawl under the engine when it is under the work shelter. Once we get all the brake rigging removed, we’ll need to remove the spring rigging. To do that we’ll need to jack up the engine to take the tension off the springs.
Once all the brake and spring rigging is removed, we will be able to thoroughly clean the frame, and test with dye penetrant. I’m guessing that this will take most of 2015 to accomplish.
If you would like to join our Steam Team or if you have further questions, please contact the Steam Foreman at baker@psrm.org.
November 2010
It was decided that Southern Pacific 2353 would be too expensive to restore at this time (see link), so we continued to evaluate Coos Bay 11. Mr Griner was optimistic in his visual examination of Coos Bay 11. Because it is such a major part of the locomotive, and probably the most expensive to repair, the boiler will be the first thing to take a good look at.
In addition to a visual examination, it will be necessary to do a complete ultrasound examination of the boiler to determine the thickness of the steel. Areas that have eroded to the point that they would be unsafe under pressure will need to be replaced, so the ultrasound testing will determine the extent of repairs needed to the boiler. Certainly, repairs to other parts of the locomotive will also be needed.
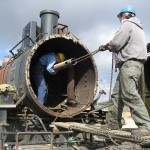
In order to get a good look at both the exterior and interior surfaces of the boiler, it would be necessary to remove the outer jacket and asbestos insulation, and all the boiler tubes. Then, all the accumulated scale and other crud that has collected inside the boiler would have to be cleaned out.
Fortunately, a number of years ago, a generous donor had agreed to do asbestos abatement work on all five of the steam locomotives we have at Campo. As part of that process, the saddle tank and sheet metal jacket had also been removed, so the locomotive was ready for us to start doing our job.
During the past several years, our volunteers have worked on this project, putting in over 1,100 man-hours (including some woman-hours). Sometimes the progress was very slow, since a number of jobs required extensive “learning time.”
In approximate order, we accomplished the following (see below for photos):
| Removed the: | smoke box door smoke box front |
Photo 1 | |||
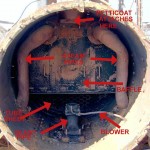
| petticoat pipe blast pipe smoke box baffle |
Photo 2 | ||||
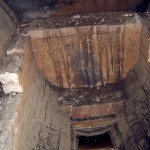
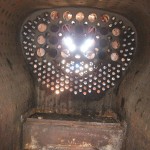
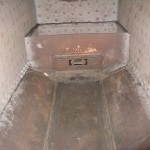
| fire brick from the fire box | Photo 3 | ||||
| all 26 superheater units throttle spool |
Photos 4 & 5 | ||||
| 23 of the 26 superheater flues | Photos 6 & 7 | ||||
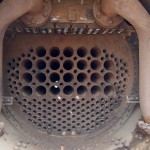
| 160 boiler tubes (short stubs remain at both tube sheets) |
Photo 8 | ||||
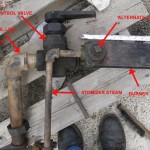
| oil burner | Photo 9 | ||||
| throttle 14 of 23 wash-out plugs |
Photo 10 | ||||
| And we: | wire-brushed and vacuumed out all tubes prior to removal | ||||
| pressure washed the boiler interior | |||||
| cleaned out the sand domes (2) | |||||
| lubricated the running gear so the locomotive could be moved | |||||
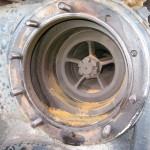
| inspected the valve cylinders | Photo 11 | ||||
| boxed and stored the cross-compound air compressor | |||||
| made covers for the dry pipe and superheater header | |||||
| had the boiler interior sand-blasted by a contractor | Photos 12-16 | ||||
| vacuumed and washed remaining sand from around the mud ring | |||||
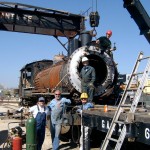
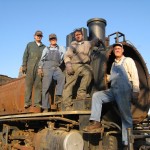
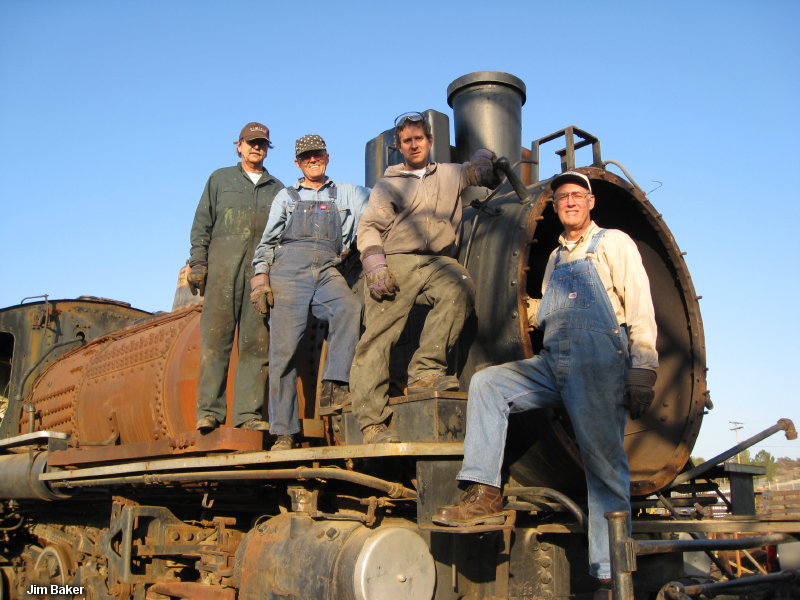
| Bob, Jim, Mike and Rich pose on #11 | Banner Photo | ||||
| Now (Aug., 2010) our next few jobs: | |||||
| lubricate the running gear again | |||||
| lubricate the running gear again | |||||
| remove the tube stubs from the front tube sheet | |||||
| remove the remaining wash-out plugs | |||||
| draw a 1ft. X 1 ft. grid on the boiler for ultrasound measurements | |||||
| Status for year end 2010: | |||||
| Running gear has been thoroughly lubricated | |||||
| All wash-out plugs have been removed, lubricated, and re-installed to keep out the rain | |||||
| A plywood cover for the front of the smoke box was fabricated and installed | |||||
| Thirty of the 160 tube stubs have been removed from the front tube sheet | |||||
| Most of a 1 ft. X 1 ft. grid has been drawn on the boiler | |||||
| For the first part of 2011 we plan to: | |||||
| Finish removing the tube stubs from the front tube sheet | |||||
| Finish drawing the ultrasound grid | |||||
| Do the ultrasound testing | |||||